Have you ever wanted to install spike light but didn’t know how? You might have wondered if the installation was hard, or if it would require lots of specialized tools and knowledge. But there’s no need to worry—here’s the best way to install your own spike light at home! This guide will walk you through everything you need to know to finish your project, from gathering supplies to creating the finished product. With plenty of photos to show exactly what the end result should look like when you’re done.
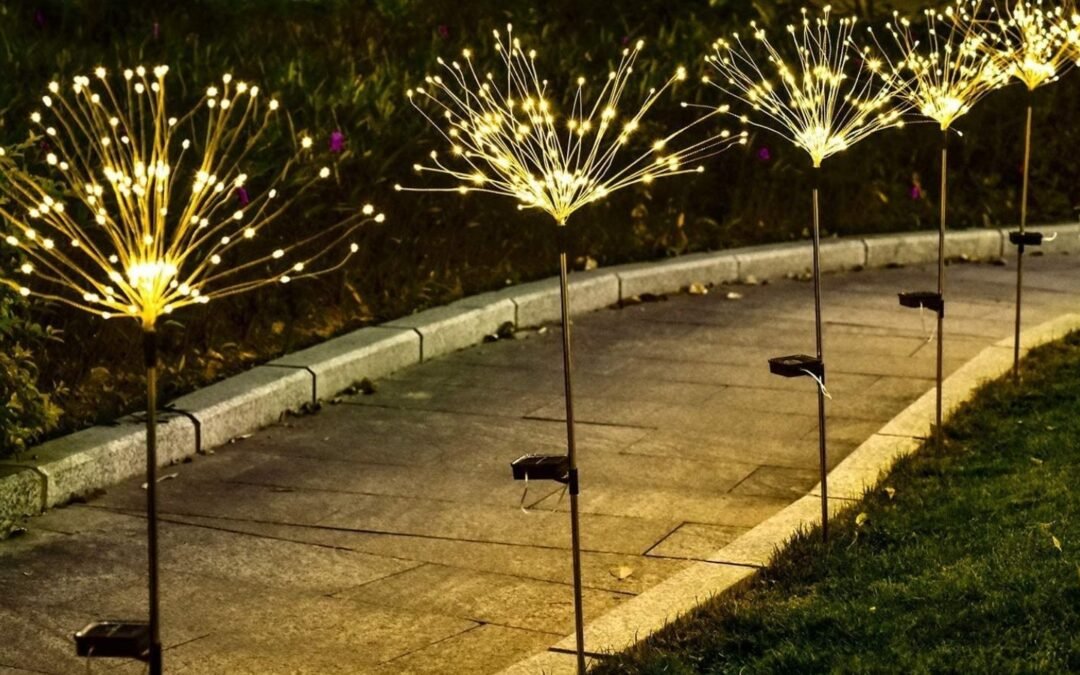
Choose the Right Spike Light
As you shop for your next backyard lighting project, it’s important to remember that not all lights are made equal. Some will be pricier than others, but there are good reasons why. The first thing you need to figure out is whether you need a cool spike light or ground spikes. Both types of lighting systems have their pros and cons, so let’s take a look at each one before making our decision.
There are two main differences between these types of lighting systems: installation and accessibility (the height at which it can shine). A spike light system requires more work because it must be screwed into concrete. These lights can also go taller, allowing them to cast shadows farther across your property in order to scare off raccoons, opossums, and other pests better.
A ground-based system doesn’t require any concrete work; instead, its lamps sit in holes in the earth. Or a top raised platforms like stepping stones, and don’t require any drilling into hard surfaces like driveways or patios. Typically, they’re less expensive than spotlights (which do require some concrete work) because they’re designed for use by people who aren’t handy with tools. If something breaks on these lights, you don’t need expensive skills to fix them. However, they tend to cover less territory than spike lights since they don’t protrude as far from the surface.
Compare Between The Two
Overall, both methods of lighting are effective for keeping critters away from your home, so it simply comes down to personal preference. Will you prefer fewer maintenance hassles? Or would you rather pay more upfront for greater coverage? Whatever path you choose, make sure your lighting kit includes everything else necessary for complete installation beforehand because adding pieces later can cause problems that may void warranties. What kind of spike light kit should I buy?

If money isn’t an issue and higher quality is important to you, go with an integrated kit since only those feature every part needed (including bulbs). Plus specialized parts like corner protectors or stakes made especially for outdoor use. Integrated kits also typically include mounting hardware. Finally, look for weatherproof parts so they won’t fall apart due to heat damage, water infiltration, or rusting after just a few months outside. What type of bulb should I use?
To keep squirrels out of your garden bed while improving nighttime visibility around your pool area or patio space, select high CRI rated PAR38 LED lights. CRI, or color rendering index, tells you how closely a light source resembles natural sunlight. The higher a light’s CRI, the closer it will come to matching daylight. For example, PAR38 LED lights are often used for floodlighting or security purposes because they have high CRI ratings of over 80.

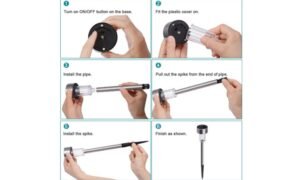
How to Install Spike Lights
To ensure that your lights are installed correctly, follow these steps: In order to avoid electrical hazards, turn off the power from the circuit breaker prior to installing any type of lighting. Next, use a stud finder and locate joists. If there is no joist in place, using a drill bit make a hole where you would like to mount your mounting bracket. Once you have determined how high above the ground you want your light to be secured, make note of it on your mounting bracket. With either an electric screwdriver or an electric drill tightens each screw into place on each post of your spike light until they are all tightly secured into place.
Using your bulb, insert it into its fitting located at the top of each light post. Use wire cutters to snip away any excess wire coming from within your mounting brackets. Connect both wires together by twisting them clockwise with a screwdriver or by wrapping electrical tape around them for safety purposes. Turn on the power switch located at the circuit breaker box before testing out your new lights! Enjoy your spike lights and remember to always replace burned-out bulbs once every season! Always keep in mind how bright your spike lights should be before placing them anywhere near children or near flammable materials. Safety first! That’s why I’m here 😉 Happy Spiking Friends!!
Tips For Installing Spike Lights
Installing your own lights is not only cost-effective but also gives you great satisfaction. Although it may seem difficult, with just a few tips under your belt, you’ll be able to install your own lights in no time. Spike lights are one of those things that can be both extremely easy and extremely difficult. All it really takes is some basic assembly, but if you don’t follow some basic rules, you might not get much out of your purchase. Read on for tips on how to properly assemble and install your new spike lights! First off, start by unboxing everything. Then take apart all of your parts. After that measure where you want them to go…then make sure they fit accordingly… At first sight, everything looks like it will fit. Next, put together all screws (if there are any) Use the screwdriver to tighten them down… After finishing assembling every piece decide where they should go… Install Lights.

Recent Comments